The Raspberry Pi doesn't come with a hard drive, instead it boots from an SD card. In order to install the operating system on the SD card you need to do what's known as flashing the SD card. To create a Raspbian SD card on a Windows system follow these instructions:
- Download the latest version of Raspbian from the Raspberry Pi website (http://www.raspberrypi.org/downloads)
- Unzip the Raspbian file to your Hard Drive, this is the disk image you will be installing onto the SD card.
- Download Win32DiskImager from their official site (https://launchpad.net/win32-image-writer/+download).
- Unzip this file to your hard drive, this is the program that will be used to create the SD card.
- Insert the SD card into the card reader. NOTE: THIS SD CARD WILL BE RE-FORMATTED, THIS WILL DELETE EVERYTHING ON IT!
- Run the Win32DiskImager application that's just been downloaded.
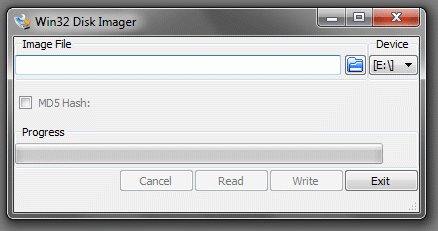
- Click on the Open icon
 and select the Raspbian disk image that's just been downloaded.
 - Ensure that the correct drive is selected in the Device drop-down. NOTE: THE DISK SELECTED WILL GET ERASED!
- Click Write to run the process and create the SD card.
When the process has finished you will have a SD card ready to insert into your Raspberry Pi and boot off.