First we'll create a circuit which we can control with the Raspberry Pi.
We're going to have a simple circuit with one LED which we'll use Python to control.
The circuit diagram is below:

To wire this up, plug the adafruit cobbler into your breadboard and find the output pin marked #17 and plug a wire into a hole in the same row as this. Plug the other end into a completely empty row (I used hole F1) then plug a resistor (if needed) into a hole in the same row as this (I1) and the other end into the + bar. Insert the long leg on your LED into another hole in the + bar and the long leg into the - bar. Finish the circuit by connecting a hole in the - bar to a hole in the same row as a pin on the cobbler marked GND. The circuit will look something like this:

We're now almost ready to write the program, there are just a few things to do before we start:
Update Raspbian to ensure we're running the latest versions of programs.
sudo apt-get update
sudo apt-get upgrade all
Install python and RPi.GPIO these two packages will allow access to the GPIO pins from python.
sudo apt-get install python-dev python-setuptools
sudo apt-get install python-rpi.gpio
You are now ready to do some python programming to control the GPIO pins on the Raspberry Pi.
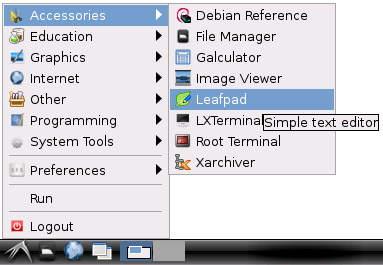
Open up Leafpad, by clicking on the main menu button, then going to Accessories and clicking on Leafpad:
This will open a text editor where you can type your program. In order to control the GPIO pins we first need to import the GPIO library, as we will also want to control timings of things within the program, we will import the time library:
import RPi.GPIO as GPIO
import time
We then specify the pin layout we're using, which pin is being used and set it to be an output:
GPIO.setmode(GPIO.BCM)
ledpin=17
GPIO.setup(ledpin,GPIO.OUT)
Now we're ready to actually program the pins to control the LED, we're going to program the LED to flash on for 1 second, off for 1 second, then on for 2 seconds, off for 2 seconds and then on for 3 seconds and off for 3 seconds.
To turn the LED on for a second, we need to set the pin to a high output, then wait for a second before we do anything else. To do this we use the following code:
GPIO.output(ledpin,1)
time.sleep(1)
We then turn off the LED by setting the pin low for a second:
GPIO.output(ledpin,0)
time.sleep(1)
We can then repeat this for the 2 second flash and the 3 second flash:
GPIO.output(ledpin,1)
time.sleep(2)
GPIO.output(ledpin,0)
time.sleep(2)
GPIO.output(ledpin,1)
time.sleep(3)
GPIO.output(ledpin,0)
time.sleep(3)
The final thing we need to do is to clean up so other processes or programs can use the GPIO pins. To do this we use the following command:
GPIO.cleanup()That is the whole program, we now need to save it as a python file. Click File, then Save As in the Name box, enter the file name you want followed by .py (I've called mine led-1.py) and click Save.
The full code should look something like this:
import RPi.GPIO as GPIO
import time
GPIO.setmode(GPIO.BCM)
ledpin=17
GPIO.setup(ledpin,GPIO.OUT)
GPIO.output(ledpin,1)
time.sleep(1)
GPIO.output(ledpin,0)
time.sleep(1)
GPIO.output(ledpin,1)
time.sleep(2)
GPIO.output(ledpin,0)
time.sleep(2)
GPIO.output(ledpin,1)
time.sleep(3)
GPIO.output(ledpin,0)
time.sleep(3)
GPIO.cleanup()
Click here to download this program as a ready to run file.
We're now ready to run the program, open LXTerminal by double clicking the icon on the desktop. You might then need to change the directory to wherever you saved the program, if you used the default home directory you don't need to do anything. To run the program type the following (replacing the led-1.py with your filename):
sudo python led-1.pyAssuming the circuit and program are correct your LED should now flash on for a second, off for a second, on for 2 seconds, off for 2 seconds, on for 3 seconds and off for 3 seconds.
DISCLAIMER: Incorrectly using the GPIO pins on your Raspberry Pi can cause damage to the Raspberry Pi, anything plugged into it, or you! I accept no responsibility for any damage caused using the code or instructions above.